Wednesday, September 4, 2013

CX5 or Bust

Cx5 did bust.... ALOT!

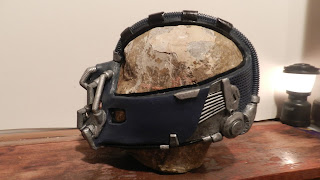
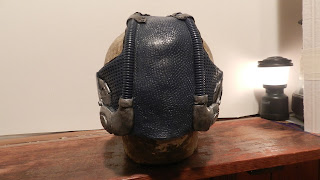
If I had the photos of the worst moments of my days at work on the mask, they would be of all the snaps and cracks of the parts I had worked hours on.
Cx5 is a great medium for small figures (as it is advertized for) but I think I gave it a test run it could not really stand up too. 
I will use it on a small basis from now on, on pipes and for small detail, not for the large stuff that needs strength. I have decided to go backwards a step to go forward. Sounds very 'Wonkonian' doesnt it?  Being this is my first real prop endeavor, I am always learning, and wont stop till its done!

I have chosen to use Apoxie Sculpt as my weapon of choice. I absolutely love this stuff. Here is a blog , I really appreciate,  that tells of all its awesome properties.

Going back to the sculpt

So the plan is to go back to the sculpt and finalize it alot more. Then, I need to make a mold of that and cast in Apoxie Sculpt (this will be alot more forgiving then the strength of a thin sheet of ice that Cx5 had). 
I already have the road map all planned out.
I am just about to make the mold of this nearly finished sculpt. This will be the underlining structure that will hold all the separate pieces of the mask.


Monday, July 22, 2013

Progress thus far- on our way

DEATH COMES UNEXPECTEDLAAAY!!!
   Since the last post I have been recovering from the 'death' of my personal/work computer which had 3 years worth of my artwork/designs/ etc on it... It was hard to make smooth progress.
NOW I have an external hard drive.. wish I did then. 

THE GOOD, THE BAD & THE UGLY


I went on a quest once again to get some things 3d printed. These are my 3d models..
This is the top ridge piece of the mask. Because it was just not something you could find in the natural world that looked quite right.

Here is an accurate rendition at the side pipes on the bane mask.

 After a couple of weeks I got the prints back.. I was pretty disappointed.


Here is the side pipe.. all the detail got completely shaved off. Material and print method have factors in this process.

BUT  I have a machinist friend who 'knurled' (now thats a million dollar word) a couple pipes for me which i will fabricate the pipes like I did before.
This is the front pipe I had 3d printed.

Here is a scuplt I did for the front pipe,the print came out pretty crappy and I also found where my digital sculpt lacked and I made up for the problems.
 The ONE piece I was happy with was the ridge piece.. I made a mold of it and cast it out of various materials, rubber and a hardening epoxy putty.


Here is the sculpt with the epoxy ridge piece resting on top.
 Here is some progress on the back
the new vs the old. almost done attaching and detailing the piece.

 The back of the mask is ready to be molded and cast in CX5.
Sorry for the wait.. now that I have posted this I will have an easier time posting further progress.

Monday, May 20, 2013

A WHOLE NEW BANE MASK

Sorry for not updating my blog. I have been hard at work on the new mask. I will unleash alot of photos that I have been mainly posting on my facebook.


Since my last post, I have  been working with the Cx5 Bane head I cast. UNFORTUNATELY the plaster <<EXPANDED>> and made the head kinda fat, which isnt good for anybody..
Soo, I decided to Redo the WHOLE THING!!

But dont worry, I've made alot of progress so far and its looking good!

The front of the new Bane mask sculpt

In red Chavant clay


 This was my initial sculpt but I didnt know what I was going to do with the grill. In the real Bane mask he has a hex-hole grill and those aren't just laying around or in your local hardware shop.. I ended up looking out of china for one!! But I just settled with using a hex wrench.. very carefully :) and I also slimmed down the space around the four nose holes.


The white pipe fitting you see was a piece I had 3D printed at Shapeways


Here is the 3D model I made in Blender
Here is the first cast I made in Cx5 and I think it came out beautifully! Nice and smooth

Had a few imperfections though to be taken care of


Here are some of the metal parts of Bane's mask that I am creating in Cx5... almost done


 I took a long time separating the grill from the mask and 'punching' very carefully with the hex wrench the holes.. Cx5 can be very brittle at times and I ended up having to recast the grill separately and 'welding' it back together a few times with my Giles Precision Waxer after dropping or snapping it. The Grill will be inserted in to the front of the mask. It will be an incorporation of the two fittings on the cheek areas and the four top fittings and two bottom fittings. I also sculpted an inset for the grill to rest in. Fits like a puzzle piece :)


here is the inset for the grill assembly


 Also the mask will be held together with magnets I formed a spot that the back piece will attach over the head and inbetween the eyes. The magnet fits great!


Well that is my current progress... more being done by the day. Hours in the labor of love..
until next time..


Monday, March 25, 2013

Pushing my Bane Masks further with Cx5

I have been able to hold back the perfectionist in me no longer... I have seen some small details that I dont have in my current Bane mask. I have decided to cast my Bane mask in Cx5 a very cool sculpting/finishing medium made by Adam Beane, check the stuff out! 
I currently have two bars into the head, and a plaster core.
As you can see though when demolding the cast some of the fittings snapped because of the amount of tension.. and I wasnt being very careful. Some of the main places I will be editing will be:
  • The front top four pipe fittings ( adding a slight arc on top fittings and lower fittings)
  • The grill pattern will have hexagonal holes rather than just holes
  • The pattern on the top of his head will look more like the 'cloth' look of the real mask
  • The rear side metal parts will have a little more detail that I overlooked
This process will take a little bit of time, but I will not be rushed, which will allow for my full concentration. Let the games begin.....

Wednesday, February 27, 2013

Recent Cast of bane mask with new paint job and new tubes

Check out these pics of my most recent cast of my bane mask, with new tubes and a new paint job. Tell me what you think...
Bane Mask front view tube detail
This photo turned out way too saturated and over compensated the blue, it is actually like the pictures below, but this photo was very nice for displaying detail of the new tubes.

a 3/4 view of the bane mask detail

side view of the my bane mask to show detail

Back of Bane Mask

Saturday, February 16, 2013

New Bane Mask Pipes

I have recently made a correction on the Bane mask that resulted in a more accurate and appealing look to the mask. I will post pictures once I finish the mask's paint job.
The pipe on the right is the first pipe I made.. The one on the left is the new MORE ACCURATE version.

Here is a closer look at the new versus old pipe for the front top 4 and bottom 2 in the mask; compare below.
Here is a picture of the real bane mask.